Etsy Store Open

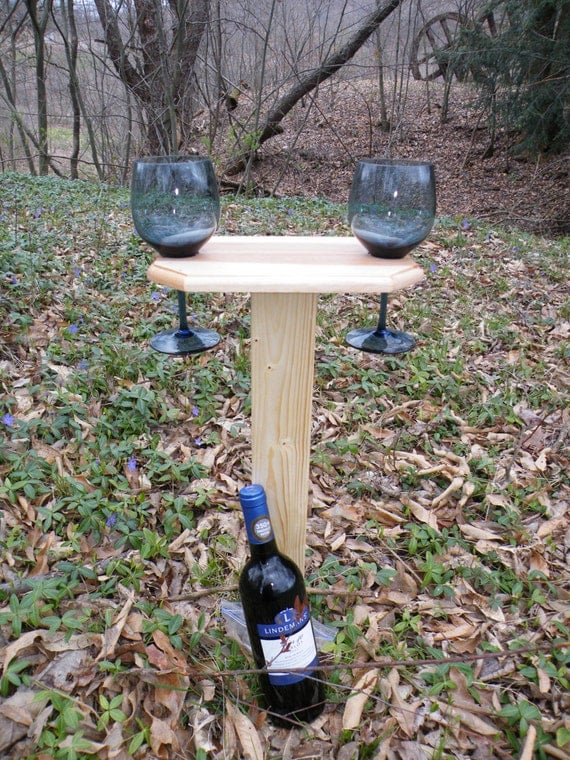
Wine Bottle and Glass Stand
After much discussion between Kassy, Nate and myself, I’ve finally opened an Etsy shop to sell the products of my second favorite hobby: Woodworking. Above, you can see my third item for sale, a wine bottle and glass holder for outdoor use. It will hold one 750ml bottle, and two wine glasses.
At this point, I’m keeping my expectations as grounded as possible, but wouldn’t it be great if this shop turned a profit, or even generated enough revenue to buy more tools ?
You can visit my etsy shop “NWPABackwoods” by clicking here: https://www.etsy.com/shop/NWPABackwoods?ref=hdr_shop_menu
Thanks !
Just in case your wondering, my favorite hobby is playing in the dirt, whether it be on the dozer, or planting tomatoes. =)
Recipe for Grape Jam

Grape Jam
A few years ago, I planted 12 different types of grapes on the farm, including many plants that I cloned. This year I’ve finally started to taste the rewards of that effort, in the form of Grape Jam. [ Continue Reading at ITfarmersblog.com ]
Rainy Cool Summer

Garden and Dozer
It’s been an unseasonable cool summer, with what seems like twice the normal amount of rain. I’ve only had to water the garden in the first few weeks after it was planted, and I haven’t touched it since. The crops are still doing very well for the most part. [ Continue Reading @ http://itfarmersblog.com/?p=2844 ]
Hoop House Trials

Ends Up
I’ve been meaning to take cool weather veggies more seriously for several years now. I’ve never had much luck with the likes of broccoli, cauliflower and cabbage, and thought there might be an issue with my timing. I was also interested in extending the growing season in the spring and fall, so I decided somewhere in the depths of the miserable winter of 2013-2014 to construct a hoop house. [ Continue Reading at ItfarmersBlog.com ]
Oliver OC-3 Dozer

Oliver OC-3 Dozer
This summer I acquired a small, antique bull-dozer. I didn’t have any use in mind for it, but the prices was too good to pass up. The first day I drove it was quite an education. For one, there are two directional handles rather then a steering wheel, and curiously, this machine had two shifters. [ Continue Reading at http://itfarmersblog.com/?p=2818 ]
Busy Building

When I Moved In
When I moved into my new home, I had a half completed project waiting for me in the background. This structure was originally intended to be a horse barn, but I’m not the type who enjoys feeding animals everyday nor do I enjoy making or stacking hay in the hot summer. So, I’ve decided to finish the building for use as [ Continue Reading at: http://itfarmersblog.com/?p=2807 ]
“A Normal Garden”

Normal Garden
After years of telling myself to cut back, I’ve finally managed to plant a much smaller, much more “normal” sized garden. It’s amazingly simple to maintain, and I only have to move the sprinkler once per watering to cover all of my plants. I’d guess the … [ Continue Reading at: http://itfarmersblog.com/?p=2798 ]
Towering Tomatoes & Number5

Last Tomatoes Planted – Roma
I’ve been starting tomatoes in my greenhouse for several years now, but I’ve just now learned something new: If you start tomatoes too early, it seems to stunt their growth. The tomatoes above were the last that I planted, and yet they … [ Continue Reading at http://itfarmersblog.com/?p=2787 ]
Trays All In

Full Table
This year I managed to get all of my tomato and pepper seeds started at roughly the same time. I started all of these trays in my home during the germination stage, and they were placed around every available window. A few trays didn’t receive nearly enough light, and when they were [ Continue Reading at http://www.itfarmersblog.com/?p=2779 ]
Tomato Trials, Winter Wrap-Up

Three Hobbies
The winter blues finally got the best of me, and so I gave in, and started planting seeds early. I told myself I was doing a tomato trial of sorts, rounding up seeds from years past and plugging them into the soil. I carefully marked each seed type, from my experimental Cherokee Wine and [ Continue Reading at http://itfarmersblog.com/?p=2763 ]
IT Farmer
 in Northwest Pennsylvania")
The Information Technology Farmer (IT Farmer) in Northwest Pennsylvania
NWPA Backwoods
 Outdoor Wine Glass Holder
I.T. Farmer’s Journey

Fight Global Warming

CO2

Going Simple

American Farmland Trust

ClustrMap


Comments: